
Moving crypto for the first time can feel a little like carrying a glass of water across a slippery floor. One wrong move, and your nerves go through the roof. That is exactly why learning how to make a transfer with Bitget Wallet matters so much in the world of Cryptocurrency. Whether you are a curious beginner, an active trader, or someone managing digital assets for work, knowing how to transfer funds correctly saves time, avoids mistakes, and builds confidence.
I still remember the first time I sent crypto from a wallet. I checked the address so many times that I nearly talked myself out of doing it. But once I understood the flow, it stopped feeling intimidating and started feeling empowering. A Bitget wallet transfer is not just a technical action. It is a basic skill that helps you move assets between exchanges, private wallets, decentralized apps, and trusted contacts with more control over your money.
In this guide, you will learn the process in a clear, calm, human way, so you can make transfers with less guesswork and a lot more confidence.
Tools Needed
Before you start, make sure everything is ready. A smooth crypto transfer usually comes down to preparation. You will need a working Bitget wallet account, enough funds to cover the amount you want to send, and a little extra for network fees. You should also have the receiver’s Bitget wallet address and know which blockchain network the transfer should use. This step matters more than many people realize because sending assets on the wrong network can create a mess that is hard to fix.
A stable internet connection and updated app version also help avoid interruptions right when you are about to confirm the transaction. Think of this as laying out your ingredients before cooking. It takes a few minutes, but it makes the whole process cleaner, faster, and safer.
| Item | Why You Need It |
|---|---|
| Bitget account or wallet app | To access your funds and begin the transfer |
| Crypto balance | To send the selected asset |
| Extra funds for fees | To pay network transaction costs |
| Recipient Bitget wallet address | The destination for your transfer |
| Correct network details | To avoid sending on the wrong chain |
| Internet connection | To complete the transfer without interruption |
| Updated app or browser | For security and smoother performance |
Bitget Wallet Instructions
Step 1: Open your Bitget wallet and log in
Start by opening the app or supported web interface and signing in carefully. If you use biometric login or a password manager, this is a good time to slow down and make sure you are entering the right account. Once inside, look over your balances and confirm that the asset you want to send is actually available. It sounds obvious, but many people rush in assuming they have enough when part of their balance is locked, staked, or sitting on a different network.
Step 2: Choose the asset you want to transfer
Select the cryptocurrency you plan to send. This is where attention matters. Not every token behaves the same way, and fees can vary a lot depending on the chain. One of the easiest mistakes in Cryptocurrency is choosing the right coin but the wrong version of it. A token may exist across multiple networks, so make sure the asset and chain match what the receiving Bitget wallet expects. That small detail can save you a major headache later.
Step 3: Copy and paste the recipient address carefully
Now enter the destination Bitget wallet address. The safest approach is to copy and paste it directly rather than typing it by hand. After pasting, check the first few characters and the last few characters against the original address. It may feel repetitive, but this habit is gold. I once paused before confirming a transfer and noticed a single character mismatch. That two-second check probably saved me from sending funds into the void. If there is a QR code available, scanning it can reduce mistakes even more.
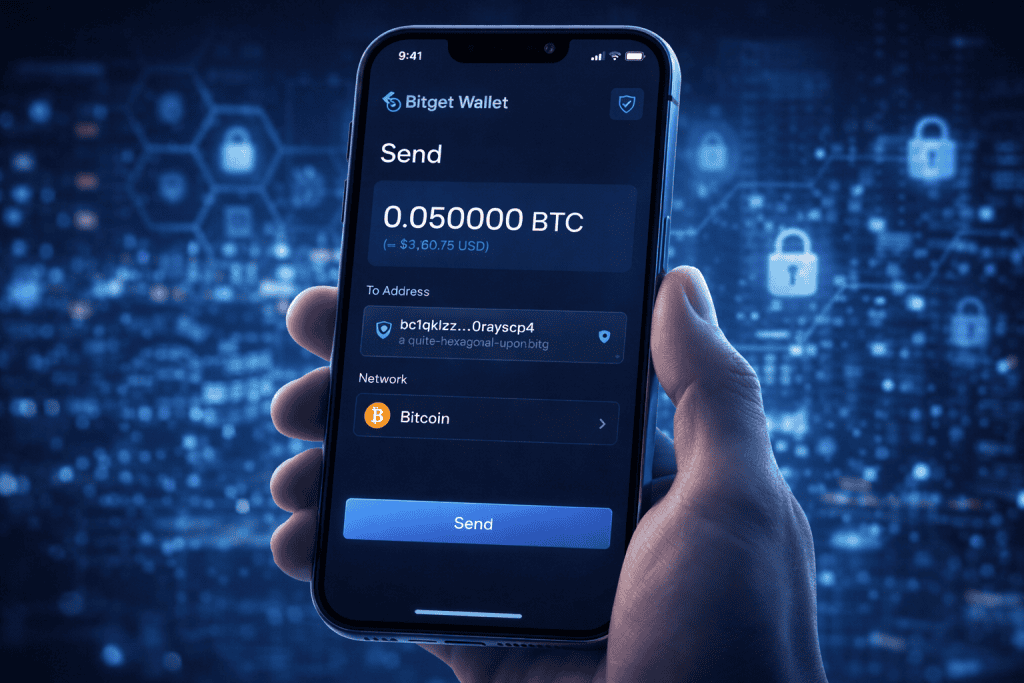
Step 4: Select the correct network and enter the amount
After the address is in place, choose the right blockchain network and type in the amount you want to send. This is the moment to be practical. If you are moving funds for the first time, consider sending a small test amount before the full balance. It is not glamorous, but it is smart. Crypto transactions live on the Blockchain, and once they are confirmed, they usually cannot be reversed. Also check the displayed network fee and make sure you still have enough balance left for it.
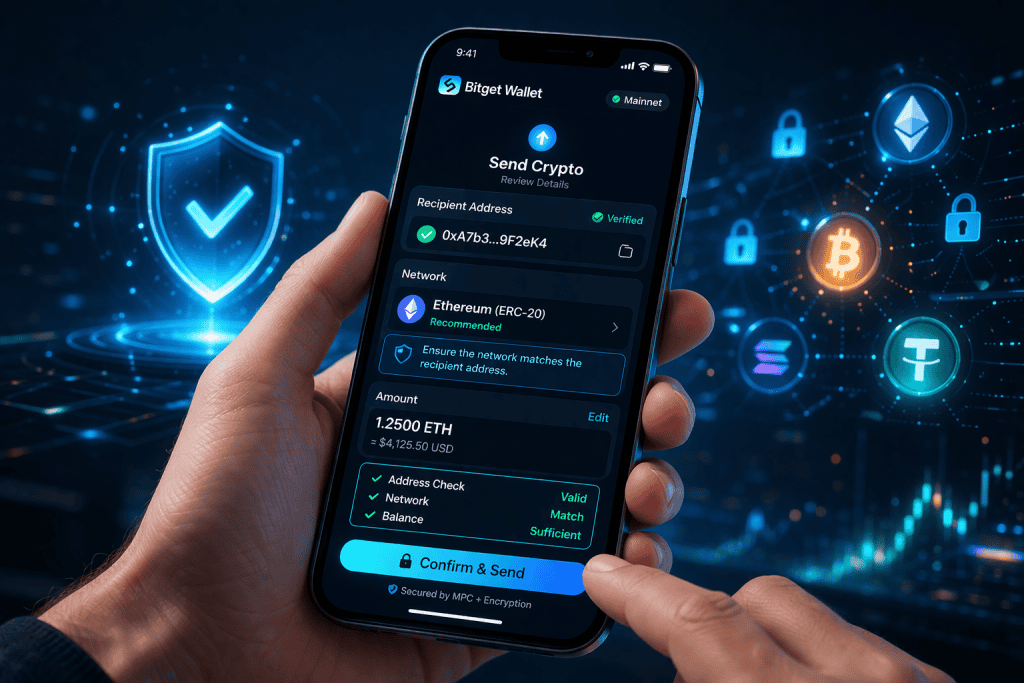
Step 5: Review every detail before confirming
This is the pause-before-you-jump moment. Read everything on the confirmation screen slowly: recipient address, selected network, asset, amount, and estimated fee. If any part looks off, stop and correct it. In a busy Crypto Market, speed often gets all the attention, but accuracy is what protects your funds. Some users like to read the address aloud or compare it line by line. It may feel excessive, but this is one place where being careful is never embarrassing.
Step 6: Complete security verification
Most platforms will ask for security checks before finalizing the transfer. That may include a password, biometric confirmation, email code, or two-factor authentication. Treat these steps as your safety net, not a nuisance. They help protect your account from unauthorized activity. If you receive a code, enter it promptly and avoid doing the transfer over public Wi-Fi. Good security habits may seem small in the moment, but they are often the difference between a routine transaction and a costly lesson.
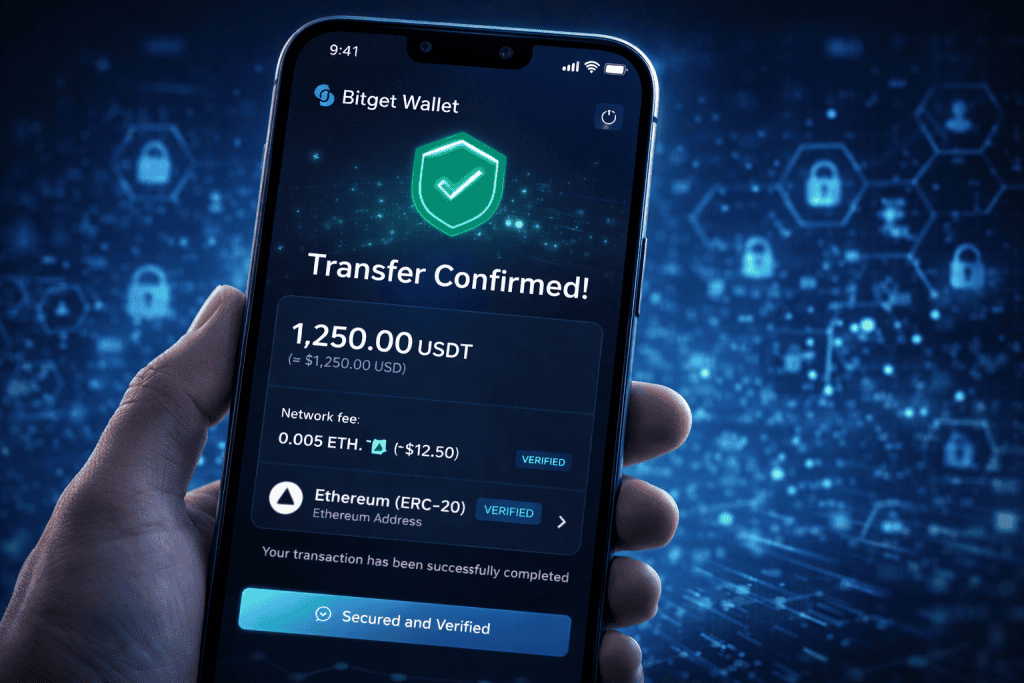
Step 7: Confirm and track the transaction
Once you confirm, the transfer request is submitted to the network. At this stage, patience matters. Some transactions move quickly, while others take longer depending on congestion and fees. Check the status in the transaction history and keep the transaction hash if one is provided. That reference can help you trace the transfer if you need support. In the Coin Market, timing can make people anxious, but refreshing the screen every five seconds rarely speeds anything up. A calm wait is part of the process.
Bitget Wallet Tips and Warnings
Using Bitget Wallet becomes much easier when you build a few careful habits into your routine. First, always double-check the wallet address and network before sending. This is the golden rule, and it never gets old. Second, try a small test transfer when sending to a new address, especially if the amount is significant. It may cost a little extra in fees, but it can protect a much larger sum. Third, keep your app updated, because older versions may miss security improvements or interface changes that help prevent mistakes.
It also helps to understand why fees rise and fall. During busy periods, sending crypto can cost more and take longer. If the transfer is not urgent, waiting for a quieter period can sometimes save money. Another smart move is to keep a simple record of your transfers, including date, amount, token, network, and transaction hash. This can make future tracking and tax reporting much easier.
There are also some warning signs worth taking seriously. Never send funds because someone online is rushing you. Pressure is a classic red flag. Be cautious with links sent through chat apps, social media, or email. Scammers often imitate support teams or fake urgent account issues. And never assume that because a transfer involves Bitcoin or another major asset, it is automatically safe. Safety comes from your process, not the coin itself.
For many users, crypto is more than a hobby. It is part of a long-term Investment strategy. That makes careful transfers even more important. Protecting your assets starts with disciplined steps, not fancy tricks. Slow is smooth, and smooth is safe.
| Tip or Warning | Why It Matters |
|---|---|
| Send a test amount first | Confirms the address and network work correctly |
| Check both beginning and end of the address | Helps catch copy errors or tampering |
| Make sure networks match | Prevents failed or lost transfers |
| Keep enough balance for fees | Avoids incomplete transactions |
| Avoid public Wi-Fi | Reduces account security risk |
| Ignore pressure tactics | Scammers often create urgency |
| Save the transaction hash | Makes tracking and support easier |
Conclusion
Transferring crypto does not have to feel like walking through a maze. Once you break it down into clear actions, the process becomes much more manageable. With Bitget Wallet, the key steps are simple: log in securely, choose the right asset, enter the correct recipient address, match the network, review the amount and fee, pass the security checks, and track the transaction after sending.
The real secret is not speed. It is care. A calm, methodical approach protects your funds and helps you build trust in your own routine. The more often you follow the process correctly, the more natural it becomes. Before long, what once felt stressful starts to feel like second nature.
If you have been putting off your first transfer because it seemed too technical, this is your sign to try it carefully. Start small, stay focused, and let confidence grow with each successful transaction.
FAQ
How do I transfer crypto safely with Bitget Wallet in the Cryptocurrency category?
The safest way is to slow down and verify every detail before you confirm anything. Check the receiving address, confirm the correct network, review the amount, and make sure you have enough funds to cover the transfer fee. For beginners in Cryptocurrency, sending a small test amount first is often the best move. It gives you proof that the address and network are correct before you send a larger balance. Also, use two-factor authentication and avoid making transfers on shared or public internet connections.
What should I do if my Bitget Wallet transfer is taking too long in Cryptocurrency?
A delayed transfer does not always mean something is wrong. Crypto networks can become congested, especially during busy trading periods. First, check your transaction history and look for the transaction hash. Then use a blockchain explorer that matches your selected network to see the current status. If the transaction is pending, it may simply need more confirmation time. If it has failed, review whether the fee, address, or network settings caused the issue. Keeping your transfer details organized makes troubleshooting much easier.
Can I use Bitget Wallet to transfer funds between an exchange and a private wallet in Cryptocurrency?
Yes, that is one of the most common uses. Many people move assets from an exchange to a personal wallet for greater control, or send them back to an exchange for trading or withdrawals. The most important part is matching the asset and network on both sides. For example, if the exchange expects a token on one chain and you send it on another, recovery can be difficult. Always read the deposit and withdrawal instructions on both platforms before confirming the transaction.
Resources
- Bitget Academy. Bitget Guide: How to Transfer Funds to a Crypto Wallet.
- Crypto News Flash. Bitget Wallet Review 2025: Security, Features, and Pricing.
- CryptoVantage. BitKeep: A Comprehensive Crypto Wallet Review.
- Cryptowisser. Bitget Wallet Overview.
- Bitget Web3 Academy. How to Deposit and Transfer Funds in Bitget Wallet.