
Ready to dive into the exciting world of decentralized finance? Using 1inch Exchange within cryptocurrency is not just a smart move, it is a game changer that can elevate your trading experience. Whether you are an experienced investor managing a diverse crypto portfolio or a curious newcomer eager to explore, learning how to master 1inch Exchange gives you a significant edge. This platform allows you to execute token swaps across various decentralized exchanges, ensuring you always get the best possible rates without wasting time manually comparing offers.
Beyond just saving money, it boosts your trading efficiency by reducing slippage and optimizing routes automatically. By understanding how to use this powerful tool, you position yourself to navigate the volatile crypto market with greater confidence. Let this guide walk you through the essential steps, breaking down what might seem complex into practical, manageable actions that help you make smarter and more profitable decisions.
1inch Exchange Materials or Tools Needed
Before you jump in, make sure you have all the essentials because starting with 1inch Exchange requires a bit of preparation. First, you’ll need a crypto wallet like MetaMask, which acts as your secure gateway to connect with the platform and manage your tokens. Without it, you won’t be able to interact with the exchange. A stable internet connection is crucial to ensure your transactions go through smoothly without interruptions that could lead to errors.
You also need to have Ethereum or another supported token ready in your wallet since that is what you will use for swaps. Lastly, having basic crypto knowledge is important because you’ll need to understand things like gas fees, slippage, and how to navigate token selections. For extra help, you can follow along with this YouTube guide which walks you through the steps visually and makes the process easier to understand.
| Tool/Material | Purpose |
|---|---|
| Crypto Wallet (e.g., MetaMask) | To connect securely to the exchange |
| Internet Connection | To access 1inch Exchange platform |
| Ethereum or Supported Token Balance | To perform token swaps |
| Basic Crypto Knowledge | To navigate rates, gas fees, and slippage |
1inch Exchange Instructions
Step 1: Connect Your Crypto Wallet
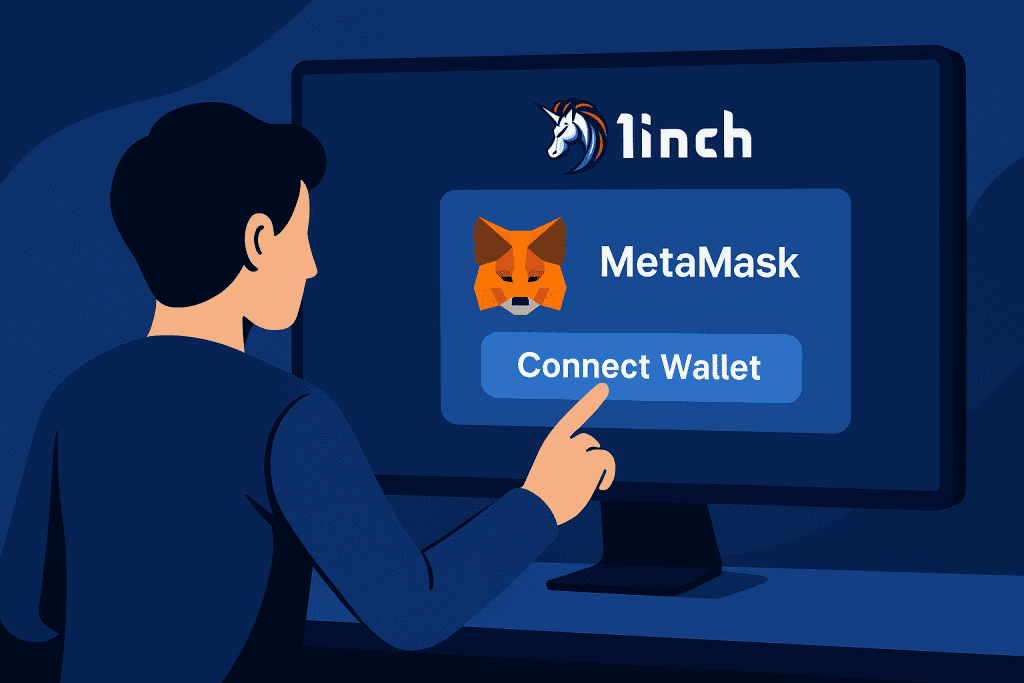
Visit the official 1inch Exchange site and click “Connect Wallet.” Select your preferred wallet such as MetaMask or Trust Wallet. Follow the prompts to authorize the connection securely. Always make sure you are on the correct blockchain network to avoid transaction issues. This connection is essential because it allows 1inch Exchange to read your wallet balances and carry out swaps on your behalf. Make sure you have enough tokens in your wallet to cover both the swap and the gas fees.
Step 2: Select Tokens for Swapping
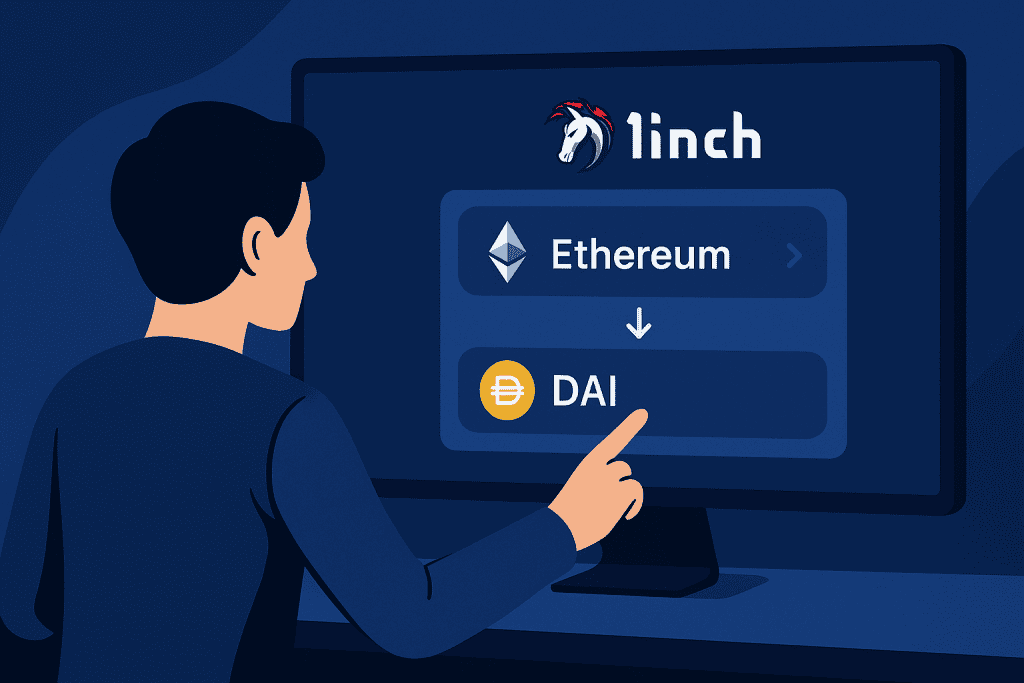
After the wallet is connected, choose which token you want to swap and which token you want to receive. For example, you might swap Ethereum for DAI or another supported token. 1inch Exchange automatically checks multiple decentralized exchanges to find the best deal. Carefully review the gas fees and slippage tolerance settings to avoid surprises. Adjust the slippage if needed, especially when dealing with volatile tokens.
Step 3: Review the Quoted Rate
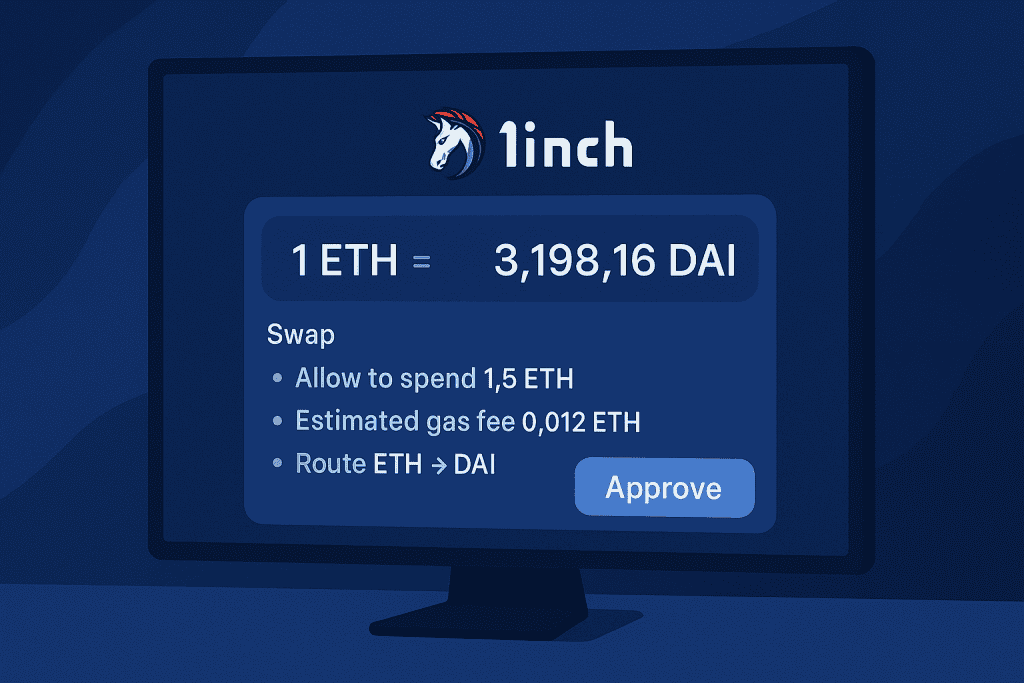
Once you’ve selected the tokens, 1inch Exchange presents you with the best available quoted rate. Take time to check this rate against the current market, but usually, 1inch delivers highly competitive prices due to its smart routing system. Review the minimum amount you will receive and ensure that the numbers meet your expectations before moving forward. Confirming this protects you from unexpected losses caused by price fluctuations.
Step 4: Confirm Transaction Details
Before proceeding, review all details carefully. Check the selected tokens, input amounts, expected output, gas fees, and slippage settings. This step acts as your final checkpoint before initiating the transaction. Make adjustments if anything seems off, as swaps on blockchain networks cannot be reversed once submitted. Confirming details thoroughly helps avoid costly errors or failed transactions that consume unnecessary gas fees.
Step 5: Execute the Swap
Once satisfied with the details, click “Swap” to initiate the transaction. Your connected wallet will display a notification prompting you to approve the transaction. Review the wallet confirmation and click “Approve.” Be sure not to close the browser or refresh the page while this is processing. Approving the swap triggers the blockchain to start executing the transaction based on the network’s current speed.
Step 6: Wait for Confirmation
After approval, the swap is sent to the blockchain where it will await confirmation. Depending on network traffic, confirmation times can vary from a few seconds to several minutes. During this time, avoid resubmitting the transaction, as doing so may lead to duplicate charges or extra gas fees. You can monitor progress through your wallet or a blockchain explorer by using the transaction ID provided.
Step 7: Check Your Wallet
Once confirmed, open your wallet and verify that the swapped tokens have been received. Sometimes, the new token might not automatically display in your wallet interface. If this happens, manually add the token’s contract address to make it visible. Checking your wallet after every swap ensures that all transactions went through as expected and that your balances are accurately updated.
1inch Exchange Tips and Warnings
Navigating the crypto space can feel overwhelming, but these tips will keep you on track:
| Tips | Warnings |
|---|---|
| Always double-check contract addresses. | Watch out for phishing sites pretending to be 1inch Exchange. |
| Use small test amounts when trying new swaps. | Be cautious with high slippage, you might lose value. |
| Keep software and wallets updated. | Never share your wallet’s private keys. |
Conclusion
Using 1inch Exchange is more than just completing a simple task; it is a valuable skill that can greatly enhance your crypto trading strategy. By carefully following each of the outlined steps, you put yourself in a position to unlock better trading rates, minimize transaction costs, and tap into the power of decentralized finance. This tool helps users bypass manual searches for the best deals and automatically connects them with the most favorable swap opportunities.
As you gain experience with 1inch Exchange, you will become more confident navigating token swaps, adjusting slippage, and managing gas fees effectively. The crypto world moves fast, and staying sharp and informed ensures you make the most of your investments. So, don’t hesitate to explore, test, and build your DeFi skills, because the more proactive you are, the more opportunities you can seize in this exciting digital landscape.
FAQs
What is the main advantage of using 1inch Exchange in cryptocurrency?
The main advantage is access to the best possible rates through smart routing. 1inch Exchange scans multiple decentralized exchanges to find optimal trades, helping users minimize fees and slippage while maximizing profits.
Can beginners in cryptocurrency safely use 1inch Exchange?
Yes, beginners can use 1inch Exchange safely, provided they follow basic security practices like using trusted wallets and double-checking URLs. While the interface is user-friendly, it’s wise for newcomers to start with small amounts and gradually build confidence.
How does 1inch Exchange support investment strategies in cryptocurrency?
By offering access to a wide range of tokens and optimal rates, 1inch Exchange enables investors to execute efficient trades, rebalance portfolios, and react quickly to market movements, supporting more agile and effective investment strategies.
Resources
- 1inch Exchange. Official Site
- Cointelegraph. 1inch Co-Founder on DeFi Inclusion
- CoinMarketCap. 1inch Exchange Overview
- BitDegree. In-depth 1inch Review
- Messari. 1inch Network Profile
- Securities.io. How to Buy 1inch